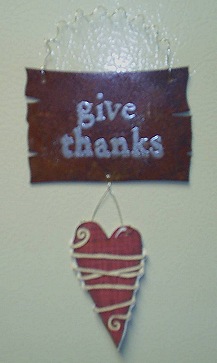
Give Thanks Magnet:Thanksgiving Craft
This cute magnet is a fun reminder to keep the spirit of the season alive and remember to give thanks for your blessings.

What you will Need:
1. Embossing ink, silver powder, and letter stamps or silver rub-on letters from a scrapbook store. 2. Metal, rusted tin sign (these can be found at almost any craft store) 3. Silver wire 4. Nail 5. Hammer 6. Cutting Board 7. Large heart sticker or maroon construction paper 8. Scissors 9. Glue 10. Hot glue gun and extra glue sticks 11. Magnet 12. White cardstock 13. Scratch paper 14. Heat source such as a hair dryer or embossing heater
Directions:
1. If you are using the embossing method follow these steps:
- Use the letters to stamp the phrase give thanks onto the metal sign with embossing ink. Dont worry about making the letters line up exactly; the charm of this craft is its rustic feel so some imperfection makes it more endearing.
- Place the sign on the scratch sheet of paper and sprinkle silver embossing powder over the phrase.
- Tap the excess powder off of the sign.
- Pick up the paper and pour the extra powder back into the bottle.
- Use the hair dryer on hot low or the embossing heater to heat the embossing powder.
Do this until the area no longer looks grainy but smooth and waxy.
2. If you are using the rub-on letters method follow these steps: a. Rub each letter of the phrase give thanks onto the metal sign. Often producers provide a Popsicle stick to rub the letters on with. b. When you have finished; be sure to look back and make sure all of the letters transferred correctly.
3. Once you have the phrase on the sign you are ready to go onto the next step. Place the metal sign, phrase side-up, on the cutting board.
4. Plug in the hot glue gun.
5. Use the hammer and nail to punch a hole in each of the top corners, and then in the bottom middle of the sign.
6. Put silver wire through the top two holes so that it makes a handle. You can curl the wire by wrapping it around a pencil a couple of times.
7. Put another piece of wire through the bottom hole. Make it so that the ends are even.
8. Put your heart sticker on the piece of cardstock and cut around the edges, or if you are making your own heart, go ahead and cut one out. If you make your own heart you will want to glue it onto a white sheet of cardstock. And then cut around the cardstock as well. This will frame the heart nicely and make it looks slightly raised. (If you have some other object you would rather hang from the magnet feel free to use it.)
9. Use the hammer and nail again to punch two holes at the top of the heart.
10. Pull the ends of the wire through the holes and use the nail to curve the wire into a small circle so that the heart does not fall off.
11. Use the hot glue gun to glue the magnet to the back of the sign.
|

