Tole Painting And Woodcut Watering Can With Flower – Craft Project
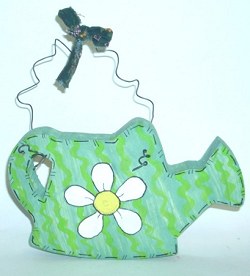
 This cute, country-styled watering can is a fun decoration indoors or out. Take a watering-can shaped piece of wood, use a few Tole painting techniques and some wire to make your own gardening themed art.
Materials:
Wood cut watering can – about 6 inches tall, 8 inches long, and 1 inch thick Wire – 10 inches long, 1/8 inch thick (flexible is best) Ribbon – scrap ribbon or fabric, 1 inch wide and 8 inches long Paint – sage green, apple green, white, black, yellow, brown Paintbrush Pencil Pliers
Instructions:
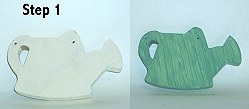
 1. You need to start with a white or cream painted watering can. Many of these woodcuts come with a white base already.
If youre using raw wood, paint it a solid coat of white or cream and let dry. Next, use sage paint mixed with a little water to lightly coat the watering can. Do this is a streaky way, showing some of the  color underneath.
Make sure to slant the strokes, as shown in the Step 1 picture. Let dry. 2. Use the apple green paint and make medium wiggly lines down the watering can, as shown in the Step 2 picture. Let dry. 3. Use a pencil to lightly sketch a single flower in the middle of your watering can, as shown in the Step 3 picture. Make one small circle as the center, and scatter five petals around it. 4. Paint in the flower. Fill the petals with white, as shown in the Step 4 picture. Fill the center with yellow.
  Add a drop of brown to a drop of yellow on your paint palette and mix. Add a little of this brownish-yellow around the outside of the center circle. Put a small dot of the brownish yellow in the center of the circle. Take some fresh yellow paint and lightly dust it over the brownish-yellow. This should leave you a yellow flower center with a tiny hint of brown. Let dry.
 5. Outline the flower petals and flower center with a thin black line, as shown in the Step 5 picture. You can use black paint, or cheat and use a fine tip black Sharpie pen. Add one, short, slightly curved line in the middle of each petal. Outline the watering can with a one long dash and two short slashes, as shown in the Step 5 picture. The pattern will be —- // —-.
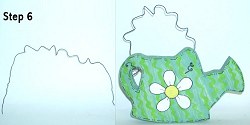
 6. Take your pliers and twist random parts of the wire into curls, as shown in the Step 6 picture. Then bend the wire into a general arc shape. Stick the ends of the wire into the watering can. Take the pliers and curl each wire end, as shown in the Step 6 picture. 7. Tie a piece of scrap fabric in a bow around the middle top of the wire. Your watering can is finished and ready to display. If you plan to put the piece outside, make sure to cover it in a solid coat of clear, waterproof sealer first.
by Aysha Schurman

